Find affordable tradespeople

HaMuch is Excellent

Patrick Smitch

A Guide To Rewiring Your Home: Breakdown Of Costs

Reasons Why You Should Rewire Your Home (1)

If you are thinking of rewiring your home, you may be asking yourself what the benefits are and how much it will cost. It’s good practice to rewire your house if it is more than 50 years old.  Your electrical wiring may need updating, especially if you are thinking of selling your home.

In this guide, you’ll gain more clarity on the reasons, benefits, and costs of rewiring your home.

Why Should I Rewire My Home?

If you are buying a home that was built a couple of decades ago, you might also want to consider updating the electrical wiring in the house. Over the years, the standard household power has changed significantly. 60 amps would have been enough years ago, but modern homes now require up to 200 amps to run HD televisions, computers, home automation devices, deep freezers, and air conditioners, along with other appliances, gadgets and gizmos.

Rewiring a home will also involve replacing worn out wires. Warning signs such as dimming lights, frequently blown fuses, frequent burning smells and electrical shocks tell you it is time for an update.

However, rewiring your home is not one of those home repairs that you can handle yourself. It’s messy and very technical work that requires the help of an expert electrician. You and your home will be safer if you get a professional to handle it.

What the Job Entails

The first step to rewiring a property is finding a qualified electrician. Electrical repairs and installations can be dangerous and should only ever be handled by a qualified professional. You can find expert home electricians in London using our database.

First, an expert electrician will conduct an electrical assessment of your home. This is vital as it helps them understand what work needs to be done.

Some homes will not need full rewiring: they will just require a few updates here and there. The full electrical assessment will reveal what work needs to be done. Some of the inspections carried out will include testing devices, inspecting the fuse board, switches and sockets, and checking the polarity of your electrical installations.

Once the inspection is done, your electrician will decide whether to carry out a total rewiring of your property.

The Benefits of Rewiring Your Home

There are a number of reasons to consider rewiring your home:

Safety: Outdated electrical wiring means that some of the wires may be damaged. This increases the likelihood of an electrical fire. An electrician will review your wiring to ensure fire accidents are not a potential hazard. Old wiring is also more likely to cause electrical shocks. Homes with such wiring problems see frequent cases of fuses blowing.

Convenience: Having your home rewired is a chance for customisation, as you’ll be able to choose where you want your power points. Many older homes have few power outlets and they are not always installed at the most convenience points. You will also get to incorporate modern switches in your newly rewired home.

Value: Rewiring a home will add value, as it reduces the risk that a homeowner will experience electrical problems for some time. Potential buyers will likely ask if your home has been rewired and, if it has not, they are well within their rights to request a cut in your selling price.

Materials Needed

Materials required for rewiring a house include electrical wires, mains power and power cable connectors, adhesive tape, junction boxes, double sockets, and fuse boards. The amount of materials needed will depend on the size of your home and condition of your current electrical system. This will impact the amount of money you can expect to pay.

The Cost of Rewiring Your Home

Just like the amount of money spent on materials is dependent on the size of the home, the total cost of rewiring a property is also dependent on its size. The extent of the job and the experience of the electrician you are working with will also affect the cost you can expect to pay. You may receive a variety of quotes. Every electrician’s quote will be a reflection of their professional references and how many years experience they possess. The hourly cost for rewiring a property can range anywhere between £15 and £80.

Average hourly and daily rates for electricians:

Location

Average Hourly Rate

Average Daily Rate

London

£44

£255

Are you looking for a qualified electrician near you? HaMuch can help! We list vetted, professional tradesmen on our platform, allowing you to search our extensive list of electrical wiring companies and electricians in London at your own convenience. We are transparent and upfront in pricing, meaning you won’t receive any nasty surprises.

How Much Does It Cost to Build a Garden Wall?

Security fence

A garden wall doesn’t just offer privacy and protect your home’s boundaries — it can be beautiful and put your home in the spotlight too! Building a wall offers many more benefits besides, including added security and various possibilities for visibility and wind protection.

If you are thinking of building a garden wall, there are some considerations you need to make in advance. These include how big you want it to be, the materials you would like to use and the cost of the job. Ideally and for a clean finish, the architecture should also match the house and its current surroundings.

What the Job Entails

The first step to building your garden wall is to find yourself a handyman, as this is a huge job that requires the help of experts. At HaMuch, we can help you find quality, reliable bricklayer services in London, allowing you to pick the tradesman who is a perfect fit for your needs and requirements.

The next step is to build a foundation where the wall will sit. Every garden wall needs a foundation and it must be sufficiently deep and wide. The last thing you want to do is endanger the stability of your garden wall by building one with a shallow foundation. Not only will it undoubtedly cost you more in the long run, but it could also pose a threat to your family and any pets.

When measuring the foundation, one good tip to keep in mind is that the depth and width will always depend on the weight, height, and width of the wall itself.

Other Costs to Consider before Building a Garden Wall

Before going ahead with the building work, you may need to get permission from your local authority for the work to be carried out. If your wall is one metre or less in height, you shouldn’t have any problems. If higher than a metre, you may need a permit, which will bump up your overall budget.

Keep in mind that the garden wall should run along the edge of the property — you should calculate in advance the minimum distance it will be to any neighbouring properties or pavements. Again, there may be a strict set of rules by your local authority that you need to follow — so it’s always best to check beforehand.

Garden Wall Building Materials

Various materials can be used for building a garden wall, including natural stone, sandstone and limestone. You can expect to pay anything from £800 to £2500 for materials to build a wall that is one metre high by four metres long. This, of course, will depend on your preferred material.

Regardless of whether you opt for a small natural stone wall to compensate for height in the garden, an entire property enclosure with a sandstone wall or a wall of carved limestone, the end result is, in any case, a gem. Here are a few benefits of each option:

Sandstone Wall

Sandstone is an eye-catcher with its stunning reddish colour. The untreated stones tend to be of different sizes, which adds to its rustic flare. Sandstone creates a stable wall, which means less decomposition and maintenance work in the long run.

Natural Stone

A natural stone wall will compliment any environment and offers an aesthetic appeal. However, this option can prevent light from entering the garden. If you enjoy growing plants, you may find a natural stone wall will block out essential light. Some plants also like to benefit from the heat that radiates from a precast stone wall when it is too cool.

Precast Stone

Of course, your wall doesn’t have to made from natural stone at all. Precast stones are available in a wide selection of various finishes. Usually, these stones are manufactured specifically to look similar to natural stones. Thin adhesive layers of mortar are normally used in these types of stone, ensuring that the individual stones hold well and the wall does not break.

The Cost of Building a Garden Wall: Labour & Materials

Building a garden wall comes with various costs, from creating the foundation to the materials to the labour costs. The table below outlines the rough cost you could expect to pay for a one metre by four metre wall.

Labour Costs:

Description

Labour Costs

Duration

1 Metre By 4 Metre Wall

£1200

4 Days

How Quickly Can A Garden Wall Be Built?

How quickly the job takes will all depend the size of your desired wall and the experience of your bricklayer. It can take an average of three to four days to dig the foundation and lay the bricks. However, a qualified bricklayer can most likely get the job done faster.

Are you looking to build a garden wall in your home? HaMuch offers a comprehensive list of fully vetted, qualified and reliable bricklayers in London, allowing you to pick the right person for the job. Get your quote today!

A Guide to Skimming a Wall: A Breakdown of Costs

Wall repairs

With the summer sun comes brighter, longer days — the perfect time to implement new inspirations and ideas in your home. Whether you have just purchased a brand new home or you are thinking of renovating your current one, chances are at some point your walls will need an overhaul. This may include re-plastering the wall, and painting or adding new wallpaper.

While it may not be noticeable, minor defects arise through the everyday use of your walls, and heat and condensation are two major contributing factors of deterioration. Renovation, therefore, is necessary not just for aesthetic purposes, but also to improve the overall health of your living space. In this guide, you will find valuable tips on skimming a wall, the costs involved and the best materials to use.

Should I Skim a Wall Myself?

With a little skill and experience, home improvements can be done yourself. However, this requires much planning, time and effort — and a lot can go wrong. Such tasks are best left to the experts, who have the long-term skill and experience to get the job done effectively and produce the perfect finish. There are plenty of plasterers in London and all over the UK that are available to help at an affordable price. However, if you’re set on giving it a go yourself, check out our top tips for a job well done.

What Is the Best Material to Skim a Wall?

Choosing the correct plaster is essential for a long-lasting, healthy wall. Before renovating your home, your plasterer will most likely ask which room in the house the wall in question is in. The plaster that you’ll need to use will depend on the surface of the wall itself — if the wrong plaster is used, you risk being threatened by mould.

Due to their moisture-regulating properties, gypsum-based adhesive plasters are best for indoor use. For wetter rooms such as bathrooms, it is better to resort to lime cement-based plasters. Using a gypsum-based plaster in your bathroom could cause mould due to regular high levels of condensation. If you’re being plagued by mould, it’s a good idea to get rid of it before plastering your walls.

Both types of plaster are available as ready mixes, which only have to be mixed with water.

How to Skim Coat a Wall

To skim a wall, you will first need a shovel. This should be made from stainless steel, or else the plaster may cause rust spots. A shovel is used to raise the plaster and to work around the areas on windows and door frames. A sponge board is also needed to felt the plaster surface during the setting process.

To create the right consistency for your plaster mix, apply water in the middle of the dry plaster. The plaster will then need to be mixed under high pressure while using the shovel. At this stage, the mixing must be done very quickly to avoid the plaster drying up.

Now it’s time to prepare your wall! The preparatory work must be done carefully to save you a lot of work later on. Before applying the plaster mixture, remove any dirt and loose particles from your wall. When plastering an old building wall, it’s also important to first use a brush to wet the surface so that the plaster will last longer.

When applying the plaster to your wall, begin by using a cleaning gauge to apply the plaster evenly. Once dried, any stains and bumps can be finished with sandpaper.

If you are planning to paint your wall or add wallpaper, you should only do this when the plaster has fully dried and hardened. It is critical to follow the manufacturer’s instructions for your chosen plaster, because the materials used can affect the drying process.

How Much Does It Cost to Skim a Wall? Labour Costs and Materials

Like most handyman jobs, the cost of skimming a wall will depend on how big the job is. There will likely be a minimum cost per job, which you can see outlined in the table below.

You can also check out Hamuch.com, where you will find an extensive list of experienced plastering companies in London. Our database of experienced plasterers also includes regularly updated hourly and daily prices, allowing you get an accurate estimate for the job you need.

Description

Price

Duration

Patch Repair

£150

2 – 3 Hours

Whole Wall

£200

3 – 4 Hours

Whole Room

£300

6 – 8  Hours

Are you looking for a plasterer in London for your wall-skimming needs? We only list fully vetted and qualified traders, giving you peace of mind that any job you need will be completed to a high standard and at a competitive cost. Find a tradesman in your area and get an instant quote today!

What is a Damp Proof Course? Does Your Home Need It?

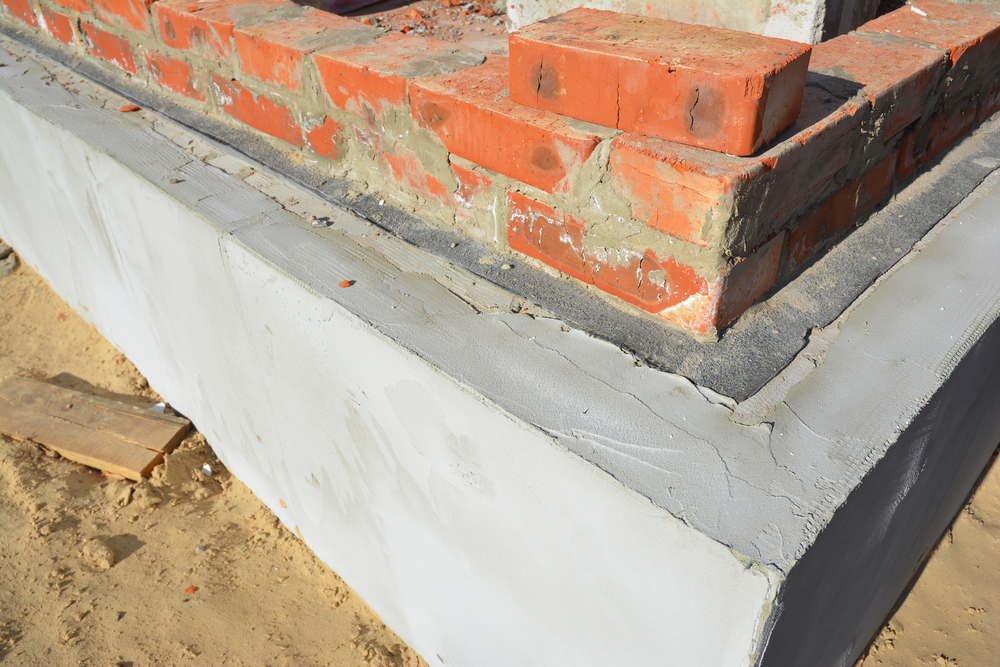
Damp proof membrane on top of foundation walls corner.

Damp proof coursing. You might have heard of it, but do you know what it is or why you need it? Our experts provide all the details.

What Exactly is a Damp Proof Course?

Damp proofing is present in every modern home, and a few not-so-modern homes. It is a thin layer of protection built between the brickwork of a house, close to where the house sits on its foundations. Often consisting of either slate or plastic — depending on how old the building is — the material runs the entire way around a property’s exterior wall.

The damp proof course is designed to do one thing: keep damp from entering the home.

How Does Damp Enter the Home?

Water from the ground can seep into the cracks and crevices of a building, either those that exist from the outset or that are created over time as the structure settles and ages.

Moisture is pushed into these gaps and spaces and, because the cracks are cold and dark, does not evaporate. The more moisture that files into the property, the further it climbs up into the brickwork. Imagine squeezing water through a sealed plastic tube.

Damp proof coursing is a barrier. Set at the bottom of the home, it stops moisture climbing up further into the property and prevents damp encroaching on your living space.

Do I Need Damp Proof Coursing?

Every home needs damp proof coursing. In the UK, the ground is often moist, even during summer months. Without damp proofing, water will climb its way into the house.

You’ll know if you are in need of damp proof coursing, as you’ll be experiencing issues such as damp spots on the walls, crumbling plasterboard, peeling paint or bubbling wallpaper, wet patches on floors, rotting floorboards and skirting boards, and build-up of salt deposits that cause circular white stains.

This is known as rising damp.

Why Is My House Experiencing Rising Damp?

If you are experiencing rising damp, your damp proof course is not working properly.

This is often caused by two factors:

  1. Wear and tear: Over time, damp proof coursing can become cracked or broken. This can occur due to many reasons. Your house may have shifted on its foundations, age might simply have played a part, or the materials used were perhaps not built to last.
  2. You don’t have any: Not all homes have damp proof coursing. While most British homes were built with protection following its rise to prevalence in the 1960s, there are still many houses in the UK that are far older than this.

How Do You Repair or Install a Damp Proof Course?

Installation or repair of a damp proof course is not a job to be undertaken as a DIY project. It requires expert knowledge, industrial materials and equipment, as well as an understanding of property structure.

Repair of a damp proof course is much easier than installation. A qualified professional can inject a special resin into targeted points of your property to seal up cracks and holes that have been created.

Installation is much trickier, as it requires removal of cement work and sometimes even brick. This is especially challenging for areas of the home that are inaccessible. Professional expertise is essential for proper damp proofing installation.

What Are the Benefits of a Damp Proof Course?

Investing in better — or new — damp proofing is essential for a stable and healthy home environment.

A damp proof course is your best defence against rising damp, which can result in not only damage to property but also numerous health problems. Damp in the home can lead to mould, which releases spores that exacerbate symptoms of respiratory conditions, such as asthma.


In need of an updated damp proof course? Does your home not have damp proofing? Find a tradesman perfect for the job in HaMuch’s extensive directory today!

How Much Does a New Bathroom Cost? Breakdown of Fees and Rates

bathroom upgrades

Considering investing in a new bathroom for your home? Not sure how much it will cost? HaMuch breaks down the major costs to help you understand what kind of financial commitment you are making.

New bathrooms are one of the most popular areas of home improvement in the UK.

Spaces we spend much of our time in, with the potential to add great value to a property, renovations to bathrooms can have a major impact on the aesthetic appeal of a home. But, despite the fact they are often the smallest rooms in our house, improvements can still be costly.

So, how much does a new bathroom cost and is it affordable for you? Here, HaMuch breaks down the average cost of a new bathroom, looking at everything from individual item costs to fees and labour charges.

Average Cost of New Bathroom Fixtures

When kitting out a new bathroom, there are heaps of different fittings and fixtures you’ll need. Depending on your project, you may want to go for every item available, or pick up the bare essentials. Below is a list of everything you could possibly need:

Bath

  • Low range: £100
  • Mid range: £300
  • High end: £1000

Starting at £100, bath prices can rise to £1000 or more. More expensive baths are often made from higher-quality materials, are larger and feature bespoke designs.

Shower  

  • Low range: £50
  • Mid range: £200
  • High end: £1000

A basic shower fitted to a bath will cost you very little. However, prices start to spike as you consider larger options, multiple fittings and full shower screen setups.

Basin

  • Low range: £50
  • Mid range: £100
  • High end: £300

Basins are often inexpensive and you can pick up a nice design for only a little more than a budget option. Even high-end fixtures don’t tend to be much more expensive. This is due to the fact most are made of the same material; ceramic or porcelain.

Faucets

  • Low range: £20
  • Mid range: £50
  • High end: £120

A good pair of taps can be very cheap — the cheapest item on your bathroom shopping list. However, more appealing designs such as waterfall taps or a copper finish will set you back a little bit more.

Toilet

  • Low range: £50
  • Mid range: £200
  • High end: £500

If you are just looking for a simply designed, functional toilet, you won’t need to pay more than £50-£100. Prices can range up to the £500 mark, though, if you are in search of something a little more stylish.

Vinyl Flooring

  • Low range: £100
  • Mid range: £200
  • High end: £400

Cost of vinyl flooring is based off both design and floor space — usually by square metre. Expect to pay £15-30 per square metre, with the average bathroom space set around 8-10 square metres.

Counters

  • Low range: £60
  • Mid range: £150
  • High end: £500

As with all types of furniture, bathroom countertops and cabinets can be obtained for a range of prices. Simple flat-pack designs can be brought in for anything as low as £60. However, if you are looking for hardwood treated options, be prepared to pay much more.

Tiling

  • Low range: £200
  • Mid range: £800
  • High end: £2000

Tiling is the one place you’ll see most variance in price. This is purely down to the material used. Cheap tiles are inexpensive and doing entire walls will cost very little. Yet, the different types of materials out there is so varied that if you want something striking and unique, you could be looking at thousands of pounds

How Much Does A New Bathroom Cost? Don’t Forget Rates for Fitting!

When considering the average cost of a new bathroom, it’s important to remember that all your new elements must be fitted. This is something many opt for as a DIY project. However, we don’t recommend this.

A poorly fitted bathroom can be a nightmare scenario. Moisture has a habit of helping bodge jobs fall apart quicker than if they were in other rooms of the house, and the regular use means if not fitted properly, things can go downhill fast.

Getting in a professional tradesman to complete your new bathroom installation is recommended. But how much will this cost?

Labourer charges vary, depending on industry and experience. However, you are looking at around £100-£200 per day for your average professional bathroom installer. This will include the cost of plumbing work or electrical changes as needed.

Job sizes vary massively when installing a new bathroom, based not only on the size of the space, but also the scale of the job. Fitting a single bath will take a day, while a full refit on a large bathroom can take a month.

Labour Rates

Until a tradesman can come into your property and give you an accurate quotation based on what you need doing, it’s impossible to say exactly how much the price of fitting your bathroom will be. However, we can provide a rough estimation:

  • Single job: £150*
  • Small bathroom: £1500-£3000
  • Medium bathroom: £2500-£4000
  • Large bathroom: £3500-£5500

*This includes call out charge and the fitting of a single item, such as bath, shower or toilet.

Overall Average Cost of a New Bathroom

There are so many variable factors involved in the average cost of a new bathroom that it’s difficult to give a figure that works for everyone.

Instead, we suggest you use this blog as a basic guide, considering unique elements involved in your own project.

For example, you may have a medium-sized bathroom that will be equipped with budget tiles, flooring, basin and toilet, yet incorporate a high-end shower. Taking the numbers provided, you can build your own rough quote to help guide you in your search for the perfect bathroom.

Need to find a tradesman to fit your new bathroom? HaMuch is a directory full of local experts listed by their rates. Find competitive prices and get in the right person for the job here!

From Budget to Luxury: Discover the Average Cost of a New Kitchen

tv room

Considering investing in a new kitchen? Find out how much you are looking at spending with our beginners guide to costs.

We all love a new kitchen. It’s one of the areas of the home we spend the most time, which is why so many Brits are inspired to cast aside their old furnishings and enjoy some of the latest trends in kitchen design.

However, whilst many desire a new kitchen, is it really an affordable luxury? The average cost of a new kitchen varies wildly. In this blog post, we break down those costs, helping you understand what options are available to you.

Budget Kitchen Installation Costs

White and brown interior with green accessories foe small kitchen

Kitchen installation is never cheap, but there are options available to reduce costs. Limitation of what you actually buy is, of course, the easiest way to keep costs down, as is the brand of supplier you use.

For a small or medium-sized kitchen, it is possible to fully kit out countertops, cabinets and even include an oven for under £3000. For larger kitchens, or if you want a full revamp that includes fridge-freezers and other appliances, you’ll be looking at up to £5000 on a budget-conscious effort.

Mid-Range New Kitchen Costs

beautiful kitchen in luxury home with island, pendant lights, cabinets, and hardwood floors. tile back splash, stainless steel oven,range, and hood compliment the elegant features

The mid-range kitchen is the one most people will decide to have installed. It includes all the basics of a budget option, but is often built from higher quality woods and materials, and also includes additional features, such as wine racks, sliding pantries, double-door fridges, central islands, larger stoves, etc. You may decide to go for granite or timber countertops over laminate.

This is the kind of kitchen you’d find in your typical suburban detached property. So what is the average cost of a new kitchen in the mid-range?

You can expect to pay between £10,000 – £25,000 for this kind of kitchen. The higher quality surfaces and larger appliances are what will really see your price rise compared to more budgetary options.

Luxury Kitchen Expenses

luxury kitchen interior with a large central island of marble

For those who consider money to be no object, kitchens can really become a lavish centre of the home. Form marbled countertops to heated floors and smart technology integration, anyone with the financial firepower behind them can build a kitchen worthy of the stars. These types of kitchens often feature bespoke design and custom-built fixtures.

A kitchen like this can be yours for around £50,000 with larger spaces with designs from premium outlets pushing past £100,000.

The main cost here is the design. After a certain point, fixtures, surfaces and appliances hit a price plateau. However, it’s the time spent by the creators behind these types of kitchens that you are paying for.

Don’t Forget Labour Rates When Considering the Average Cost of a New Kitchen

After buying up all your new fittings, furnishings and appliances, you’ll need them installed. Unless you have the qualifications and skills required for such work, or have paid a service to do this as part of the kitchen purchase, this will require a tradesman.

Kitchens can take a variable amount of time to install. This all depends on the type of fittings required, the amount of new items that need placing, the state of the old kitchen and the size of the space.

Therefore, will always be unique to the job.

However, we know this is not helpful information, so to give you an idea, we’re going to make some broad generalisations in an effort to at least help you understand the sort of rates people pay when hiring a tradesman to fit their kitchen.

How Much Are Labour Rates for Kitchen Installation?

Your average kitchen will take around seven days to install — for luxury, bespoke kitchens, expect this to take far longer, ranging into a month or more. This includes stripping out the old appliances and fittings, making any necessary plumbing or electrical changes and installing the new kitchen itself. Work will take place over the course of your average eight-hour day.

Workers carrying out this type of job will charge, on average, between £100-£200 for the job per day.

This means, for a typical kitchen installation job carried out by a qualified trader, you’ll be looking at an additional fee, on top of the purchasing of your fittings, of around £700-£1400.

Average Cost of a New Kitchen: Price Breakdown

With all these notes in mind, here is a rough breakdown of average costs you can expect to pay when buying a new kitchen:

  • Budget: £4000-£6000
  • Mid-Range: £11,000-£26,000
  • Luxury: £60,000+


Looking for expert traders to help install your kitchen? HaMuch allows you to compare professionals in your area not only by specialism, but by rates too! Get the best deal with the best provider, only on HaMuch.

Wasp Nest Removal Tips: DIY Advice for Homeowners

Empty wasp's nest stuck to the wooden door of the shed, close up

Wasp nests are a very undesirable feature of a garden or home, and one people swiftly want rid of. Discover how to remove this infestation today.

Finding a wasp nest on your property is something many homeowners dread. Getting rid of the hive and removing the wasps from your land becomes a top priority, but how do you do it?

How Not to Carry Out Wasp Nest Removal

Before we look at how to get rid of a wasp nest, let’s first consider how you shouldn’t do it. While it might seem like a straightforward operation, there are plenty of wrong ways to carry out wasp nest removal. Such as:

  • Destroying the nest: A physical attack, consisting of bashing the nest to pieces with a bat, racket, stick or anything else, is a bad idea. This will promote a very aggressive response from the hive, endangering not only yourself but those nearby. It also won’t kill the wasps, only destroy their nest, likely leading to a return.
  • Setting fire to the wasp nest: Setting fire to a wasp nest is a poor idea for two reasons. The first is that it will not kill all the wasps, which means they will likely return. The structure of the nest is also flammable, which risks leading to the fire spreading or causing harm.
  • Drowning out the nest: Some people look to flooding a nest as a method of removing wasps. This will not work. Wasps nests are often built outside and are resilient to water. You may cause damage and reduce numbers, but it will recover. You’ll also risk property damage if the nest is inside, such as in the attic or garage.

DIY Wasp Nest Removal

Considering DIY wasp nest removal? This is not actually a practice we recommend, although it can be done if:

  • The nest is in a secluded location
  • You don’t have children or pets around
  • The nest is small
  • You know you are not allergic to wasp stings
  • The nest is easy to reach

Prepare for Removal

Before you start the process of removing a wasp nest, you need to make sure you are prepared for the task. This isn’t simply a case of picking it up and placing it in the bin; you know that or you wouldn’t be here!

You’ll need full protective clothing, as removal will likely anger a lot of wasps. This includes thick and long sleeves, gloves, boots, a hat and face coverage as well as something for your eyes. Swimming goggles or a snorkel mask can work. Make sure you tuck everything in. A wasp under your clothes will do a lot of damage.

You’ll then need to acquire all you need for a wasp removal job:

  1. The correct kind of pesticides
  2. Thick bin bags or a large enough container for the nest

Carrying Out Removal

Once you are prepared, take your pesticides — be it a powder or spray — and use it on the nest as instructions dictate. Do this at night, when the wasps are inactive. It does not guarantee they will not respond, but it reduces the risk. Be sure to wear all your protective gear.

Now, you must wait. The pesticides will likely kill the wasps over the period of a few days. Monitor the nest during this time, waiting for it to become inactive. You may find you have a few stragglers, but the pesticides should kill most of the wasps. Once dead, put your protective gear back on, cut the nest free and place it in a bin sack or container. Be sure to seal the nest up and place it in your black bin.

Wasp Nest Removal We Recommend

Wasp nest removal can be a tough job, especially if it’s large, in a hard to reach place, or is actually inhabited by a more aggressive species, such as hornets. Proper removal is key to avoiding not only harm to yourself and others, but a return of the pests.

While you can remove a wasp nest yourself under certain circumstances, we would always recommend that you call out a professional. A pest control expert can ensure wasp nest removal is carried out to the highest standards without risk.

Need help with wasp nest removal? Don’t think you are the right person for the job? No problem! HaMuch is a directory of experts from around the UK. Search our list of pest control professionals to find one near you, all while finding the best rates.